Given buildings
1. DEBY_LOD2_4959462
2. DEBY_LOD2_4959460
- 3. DEBY_LOD2_4959322
- 4. DEBY_LOD2_4959323
- 5. DEBY_LOD2_4906981
- 6. DEBY_LOD2_4959458
- 7. DEBY_LOD2_4959459
- 8. DEBY_LOD2_4959323_MoFa [link]
- 9. DEBY_LOD2_4959457 [link]
- ---
- 10. DEBY_LOD2_4906970 [link] [x]
- 11. DEBY_LOD2_4907207 [Chenkun] [link] [x]
- 12. DEBY_LOD2_4907183 [Yue] [link] [x]
- 13. DEBY_LOD2_4907184 [Yue] [link] [x]
- 14. DEBY_LOD2_4907178 [Yue] [link] [x]
- 15. DEBY_LOD2_4907179 [Yue] [link] [x]
- 16. DEBY_LOD2_4907180 [Chenkun] [link] [x]
- 17. DEBY_LOD2_4906965 [Chenkun] [link] [x]
- 18. DEBY_LOD2_4907173 [Chenkun][link] [x]
- 19. DEBY_LOD2_4907206 [Chenkun] [link] [x]
- 20. DEBY_LOD2_4907204 [Chenkun][link] [x]
- 21. DEBY_LOD2_4907201[Chenkun] [link] [x]
- 22. DEBY_LOD2_4907196 [Chenkun] [link] [x]
- 23. DEBY_LOD2_4906966 [Chenkun][link] [x]
---
- 24. DEBY_LOD2_4907025 [Prabin][link] [ ]
- 25. DEBY_LOD2_60042 [Prabin][link] [x]
- 26. DEBY_LOD2_4959320 [Prabin][link] [ ]
- 27. DEBY_LOD2_4907521 [Prabin][link] [ ]
- 28. DEBY_LOD2_4907520 [Prabin][link] [x]
- 29. DEBY_LOD2_4907518 [Prabin][link] [ ]
- 30. DEBY_LOD2_4907517 [Prabin][link] [ ]
- 31. DEBY_LOD2_4907516 [Prabin][link] [ ]
- 32.DEBY_LOD2_4907515 [Prabin][link][]
- 33. DEBY_LOD2_4907514 [Prabin][link][]
- 34. DEBY_LOD2_4907507 [Prabin] [link]
- 35. DEBY_LOD2_4907506 [Prabin][link]
Related files:
Footprints [link]
Settings file [link]
Online buildings viewer [link]
folder with point clouds [link]
Issues
- DEBY_LOD2_4906970 (Yue)


- DEBY_LOD2_4907178 (Yue)
- DEBY_LOD2_4907178 (Yue)
same issues as above - only the balcony on the very top should remain as class 'balcony'.
- DEBY_LOD2_4907184 (Yue)
very good!
- DEBY_LOD2_4907183 (Yue?)
Is it taken by Chenkun?
- DEBY_LOD2_4906965 (Chenkun)


- DEBY_LOD2_4907173 (Chenkun)

- DEBY_LOD2_4907180 (Chenkun)

- DEBY_LOD2_4907196 (Chenkun)

- DEBY_LOD2_4907201 (Chenkun)


- DEBY_LOD2_4907204 (Chenkun)

- DEBY_LOD2_4907206 (Chenkun)

- DEBY_LOD2_4907207 (Chenkun)


- DEBY_LOD2_4907520(Prabin)
Reports
- Quantitative assessment:
- IDs of already labeled buildings + approx. time spent
- Qualitative assessment:
- Selected pictures of labeled buildings
Working time
| Building No | Hours | No of points |
|---|---|---|
| 1 | 16 | ~12.5 mln |
| 2 | 18 | |
| 3 | 7 | |
| 4 | 21.5 | |
| 5 | 20.5 | |
| 6 | ||
| 7 | 22.4h | |
| 8 | 5.5 |
12 Kommentare
Unbekannter Benutzer (ge35fep) sagt:
12. Juli 2021- Issue 1
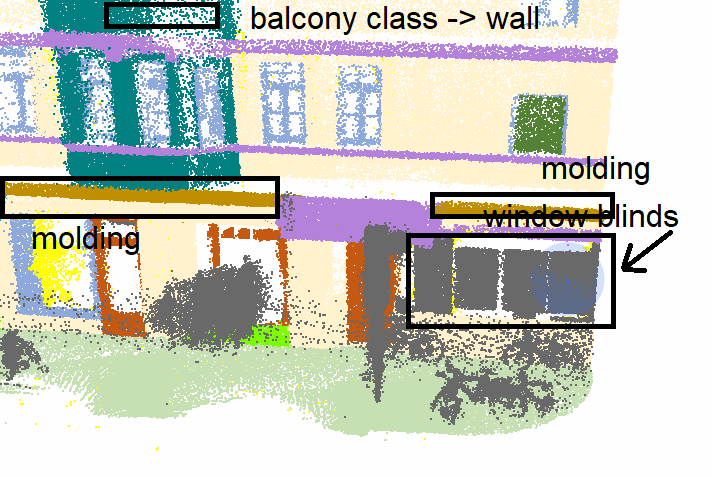
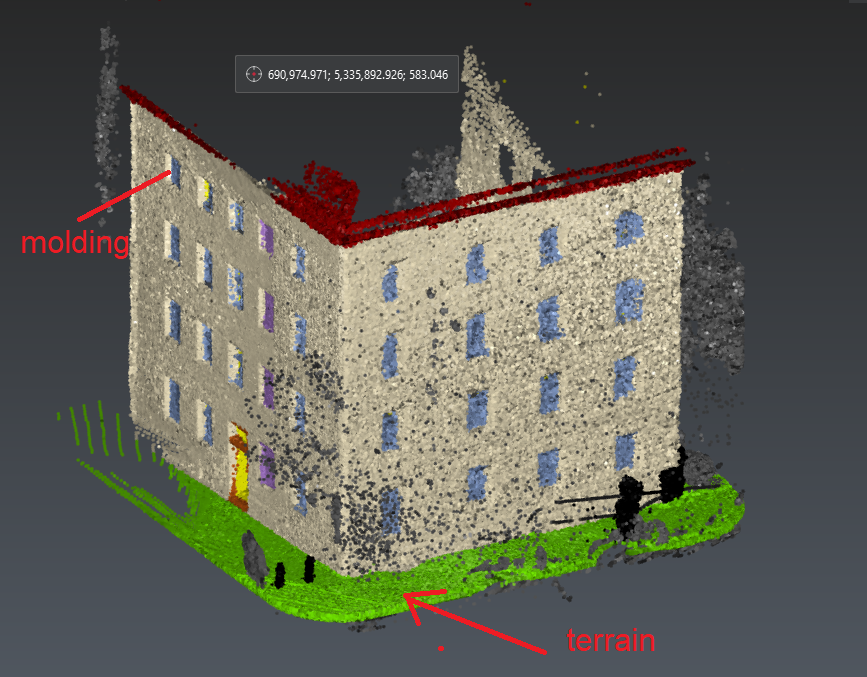
For many small PCD files (around 10M - 100M), it's hard to recognize which kind of elements they are, some cases are shown below
- Issue2
The labelling operations are not smooth when processing the large PCD files(more than 200M, for instance, DEBY_LOD2_4959460_00.pcd)
My machine settings: Dell XPS 13, Intel(R) Core(TM) i7-8550U CPU @ 1.80GHz 2.00 GHz, RAM 8.0G, no GPU
Unbekannter Benutzer (ge35fep) sagt:
25. Juli 2021around 3 hours
Unbekannter Benutzer (ge35fep) sagt:
25. Juli 2021Unbekannter Benutzer (ge35fep) sagt:
14. August 2021~ 1h: Refining the results of building DEBY_LOD2_4959462
Building DEBY_LOD2_4959460 ~ 18 hours
~ 3h
~ 1.5h
~ 4h
~ 2.5h
~ 1.5h
~ 1h
~ 2h
~ 2.5h
Unbekannter Benutzer (ge35fep) sagt:
18. August 2021Building DEBY_LOD2_4959322 ~ 7 hours
~ 2h
~ 2.5h
~ 2.5h
Unbekannter Benutzer (ge35fep) sagt:
05. Oktober 2021Building DEBY_LOD2_4959323 ~ 21.5 hours
~ 1.5h
~ 1h
~ 3h
~ 1.5h
~ 1.5h
~ 1.5h
~ 2.5h
~ 1h
~ 2.5h
~ 7h
Building DEBY_LOD2_4906981 ~ 20.5 hours
~ 8h
~ 1h
~ 3h
~ 2h
~ 1.5h
~ 5h
Unbekannter Benutzer (ge47pur) sagt:
13. Februar 2023Building DEBY_LOD2_4959323_MoFa ~ 30.5 hours
~ 7h
~ 2h
~ 4h
~ 6h
~ 1h
~ 3h
~ 2.5h
~ 5h
Building DEBY_LOD2_4959457 ~ 35 hours
~ 6.5h
~ 2.5h
~ 4h
~ 4h
~ 5.5h
~ 3h
~ 6h
~ 3.5h
Anonym sagt:
10. Juni 2023Building DEBY_LOD2_4906970 ~ 24 hours
Setting software for windows ~ 10 Hours
~ 3h
~ 3h
~ 6.5h
~ 6h
~ 5.5h
~ 2h
~ 2h
~ 6h
Unbekannter Benutzer (ge47pur) sagt:
10. Juni 2023From Yue Tan
Unbekannter Benutzer (ge47pur) sagt:
10. Juni 2023Here is the instruction for setting the software semantic segmentation editor (SSE) in windows (take my win11 as an example):
$env:METEOR_SETTINGS = Get-Content ./settings.json -Raw
$env:SSE_IMAGES = "D:\_GUG_Master_Program\PointLabelling\semantic-segmentation-editor-master\semantic-segmentation-editor-master\datasets"
docker-compose -f stack.yml up
Here D:\_GUG_Master_Program\PointLabelling\semantic-segmentation-editor-master\semantic-segmentation-editor-master\datasets is the absolute file path of my point cloud, you can switch to yours.
Unbekannter Benutzer (ge47pur) sagt:
13. Juni 2023ps: remember to rename your compose file sse-docker-stack.yml as stack.yml, or change the docker-compose -f stack.yml up as docker-compose -f sse-docker-stack.yml
Olaf Wysocki sagt:
01. Dezember 2023For Ubuntu:
In my case the full command looks like that:
METEOR_SETTINGS=$(cat ./settings.json) SSE_IMAGES=/home/olaf/Olaf/PhD/3DFacadesLabeling/semantic-segmentation-editor-1.6.0/data docker-compose -f /home/olaf/Olaf/PhD/3DFacadesLabeling/semantic-segmentation-editor-1.6.0/sse-docker-stack.yml up
In case there are furtrher issues when running the software:
Now, you just need to swap the settings.json file and add the data to the "dataset" folder (/home/ge47pur/project/semantic-segmentation-editor-1.6.0/datasets).
The only thing you need to do is:
METEOR_SETTINGS=$(cat ./settings.json) SSE_IMAGES=/home/ge47pur/project/semantic-segmentation-editor-1.6.0/datasets docker-compose -f stack.yml up
In case you will get the permission error again:
sudo chmod 666 /var/run/docker.sock