Introduction
The Computational Network Tool Kit (new label: Microsoft Cognitive Toolkit) is available to the public since January 2016 and is continously developed further. This video provides a high-level view of the toolkit. It can be included as a library in your Python or C++ programs, or used as a standalone machine learning tool through its own model describtion language (BrainScript). (1)
Installation
First of all the installation needs sophisticated knowledge of windows or linux systems. CNTK can be installed either from Source Code or from Binary. The Binary installation is much easier but there is no option to change the source code from CNTK. Installation from Source requires Visual Studio and some other libraries installed on your machine. More Information can be found at the Wiki-Page of CNTK.
The detailed installation steps for binary installation can be summarized as follows:
- Download and prepare the Microsoft Cognitive Toolkit
- Prepare to run PowerShell scripts
- Run the Powershell installation script
- Update your GPU Driver
- Verify the setup from Python
- Verify the setup for BrainScript
The detailed installtation steps for installation from source code can be summarized as follows:
- Setting all required environment variables in batch mode
- Install Visual Studio 2015 with Update 3
- Install MKL Library
- Install MS-MPI
- Install Boost Library
- Install Protobuf
- Install NVIDIA CUDA 8
- Install cuDNN
- Install CUB
- Install Latest GPU card driver
- Download Getting CNTK Source code
- Building CNTK
Quick test of CNTK build functionality
Trying CNTK with GPU
Trying the CNTK Python API
Example Network
(configuration.cntk)
# Copyright (c) Microsoft. All rights reserved.
# Licensed under the MIT license. See LICENSE file in the project root for full license information.

# 3 class classification with softmax - cntk script -- Network Description Language

# which commands to run
command=Train:Output:dumpNodeInfo:Test

# required...
modelPath = "Models/MC.dnn"      # where to write the model to
deviceId = -1                    # -1 means CPU; use 0 for your first GPU, 1 for the second etc.
dimension = 2                    # input data dimensions
labelDimension = 3

# training config
Train = [
    action="train"

    # network description
    BrainScriptNetworkBuilder=[

        # sample and label dimensions
        SDim = $dimension$
        LDim = $labelDimension$

        features = Input (SDim)
        labels   = Input (LDim)

        # parameters to learn
        b = Parameter (LDim, 1)
        w = Parameter (LDim, SDim)

        # operations
        z = w * features + b

        ce = CrossEntropyWithSoftmax (labels, z)
        errs = ClassificationError (labels, z)

        # root nodes
        featureNodes    = (features)
        labelNodes      = (labels)
        criterionNodes  = (ce)
        evaluationNodes = (errs)
        outputNodes     = (z)
    ]

    # configuration parameters of the SGD procedure
    SGD = [
        epochSize = 0                   # =0 means size of the training set
        minibatchSize = 25
        learningRatesPerSample = 0.04   # gradient contribution from each sample
        maxEpochs = 50
    ]

    # configuration of data reading
    reader = [

        readerType = "CNTKTextFormatReader"
        file = "Train-3Classes_cntk_text.txt"

        input = [
            features = [
                dim = $dimension$
                format = "dense"
            ]
            labels = [
                dim = $labelDimension$     # there are 3 different labels
                format = "dense"
            ]
        ]
    ]
]

# test
Test = [
    action = "test"
    reader = [
        readerType="CNTKTextFormatReader"
        file="Test-3Classes_cntk_text.txt"
        input = [
            features = [
                dim = $dimension$
                format = "dense"
            ]
            labels = [
                dim = $labelDimension$     # there are 3 different labels
                format = "dense"
            ]
        ]
    ]
]

# output the results
Output = [
    action="write"
    reader=[
        readerType="CNTKTextFormatReader"
        file="Test-3Classes_cntk_text.txt"

        input = [
            features = [
                dim = $dimension$
                format = "dense"
            ]
            labels = [
                dim = $labelDimension$     # there are 3 different labels
                format = "dense"
            ]
        ]
    ]
    outputPath = "MC.txt"        # dump the output to this text file
]

# dump parameter values
DumpNodeInfo = [
    action = "dumpNode"
    printValues = true
]
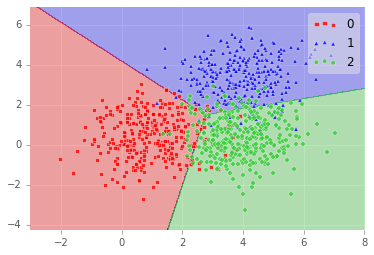
This example show how to setup a network which can cluster datapoints into different classes. The networks achieves 89.8% accuracy after training 50 Epochs. The result is shown in Figure 2.
Figure 2: Visualization of the result. The network is clustering the data into three parts.(1)
Key Characteristics of CNTK
- CNTK uses stochastic gradient descent algorithm to train a model.
- Data Readers
- CNTKTextFormatReader - reads the text-based CNTK format, which supports multiple inputs combined in the same file.
- UCIFastReader (deprecated) - reads the text-based UCI format, which contains labels and features combined in one file.
- ImageReader - reads images with paths to the images inside a txt file.
- HTKMLFReader - reads the HTK/MLF format files, often used in speech recognition applications.
- LMSequenceReader - reads text-based files that contain word sequences, for predicting word sequences. This is often used in language modeling.
- LUSequenceReader - reads text-based files that contain word sequences and their labels. This is often used for language understanding.
- CNTK can perform:
- Batch-Normalization
- Dropout
- RecurrentLSTM Layers
- Convolutional Layers
- Fully Connected Layers
- Stabilizer Layers
- Delay Layers
- Pooling
- Normalization
- Implemented Activation Functions:
- Implemented Loss Functions:
CrossEntropyWithSoftmax(targetDistribution, nonNormalizedLogClassPosteriors)CrossEntropy(targetDistribution, classPosteriors)Logistic(label, probability)WeightedLogistic(label, probability, instanceWeight)ClassificationError(labels, nonNormalizedLogClassPosteriors)MatrixL1Reg(matrix)MatrixL2Reg(matrix)SquareError (x, y)
For a full function reference visit: https://github.com/Microsoft/CNTK/wiki/Full-Function-Reference (1)
Literature
- https://github.com/Microsoft/CNTK/wiki
- https://www.microsoft.com/en-us/research/product/cognitive-toolkit/ (Microsofts Home-Page for CNTK)

